Amazon Fire tablets rank among the best cheap tablets around; they’re lightweight, durable, and come with quite a few useful apps. However, unlike other Android tablets, Fire slates don’t (officially) have access to the Google Play Store, so you can’t download many new apps.
The Google Play Store is a staple of the Android experience and your gateway to the world’s best Android apps. Amazon Fire tablets only let you download from a curated list of apps – a far smaller selection than the Play Store offers – so many people choose to side-load the Play Store onto their Amazon devices.
If that’s you, a word of warning: installing the Play Store onto an Amazon tablet is complicated, time-consuming, and frustrating. I’ve been writing about technology for years and even I found this process hard – I had to reset my tablet multiple times when I accidentally made a mistake, or couldn’t figure something out and needed to start again. If I wasn’t tasked with covering this subject for work, I would’ve just bought a cheap Android tablet.
Only try this if you’re well-versed in tech, have a good half-hour to an hour to spare, and don’t mind having to reset your Fire tab a few times if you make a mistake. I’d also recommend backing up your data and removing any memory cards, to be safe, and most importantly reading this guide before you begin.
So, if you hardy tech users are ready, here’s how to get the Google Play Store on an Amazon Fire tablet.
Tools and requirements
To install the Play Store on your Amazon Fire tablet, you’ll need two things:
- A Google account, which you created previously.
- An Amazon Fire tablet. It’ll work on any kind, though the model will affect the process – more on that later. It needs to be connected to the internet.
Quick steps on how to get the Play Store on an Amazon Fire Tablet
In short, here’s how you get the Play Store on your Amazon Fire tablet. For a more in-depth guide, continue reading.
- Set up your tablet by backing everything up, finding out your slate’s model number and software version, and allowing installations from Silk.
- Download APKs of the four apps you’ll need: Google Account Manager, Google Services Framework, Google Play Services, and Google Play Store.
- Install the four apps in the above order.
- Reboot your tablet and log into the Play Store.
Step-by-step guide
Get your tablet ready, it’s time to begin.
1. Set up your tablet
To install the Google Play Store, you’ll need to get your tablet ready first. Before you even begin, I’d recommend backing up your data so you can easily reset the tablet without worrying about losing anything.
First, you’ll need to know what kind of Amazon tablet you actually have. To find out, select the Settings app from the home page and then press Device Options near the bottom. Here, under About Fire Tablet, you’ll see your model – mine, as you’ll see in the image, is the Fire HD 10 (13th Generation).
Make a note of this because it’ll be vitally important for the later steps. Next, navigate back to the Settings app because we’re not finished here yet.
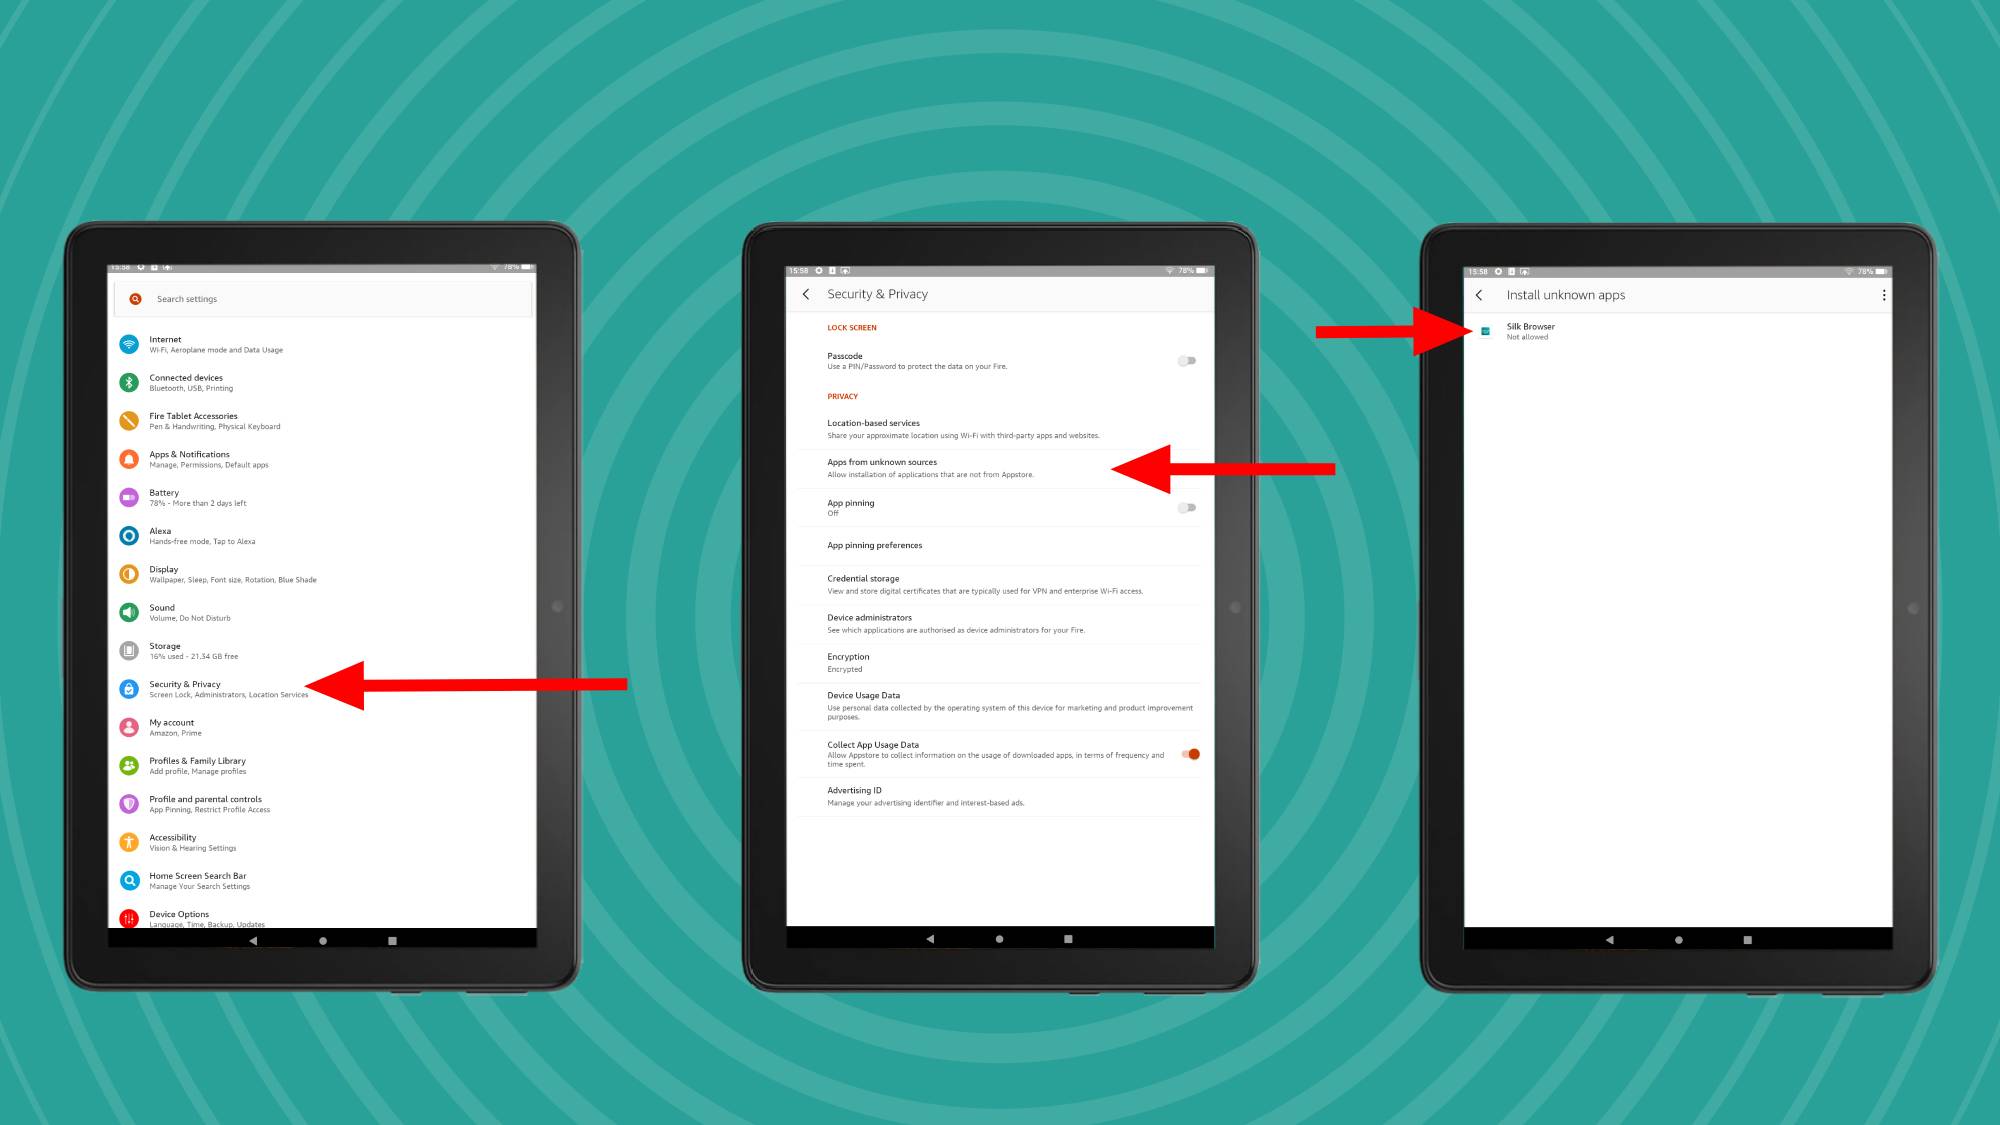
Next, we’re making sure we can install the apps we need. From the Settings app, press Security & Privacy and then Apps from unknown sources under the Privacy sub-menu.
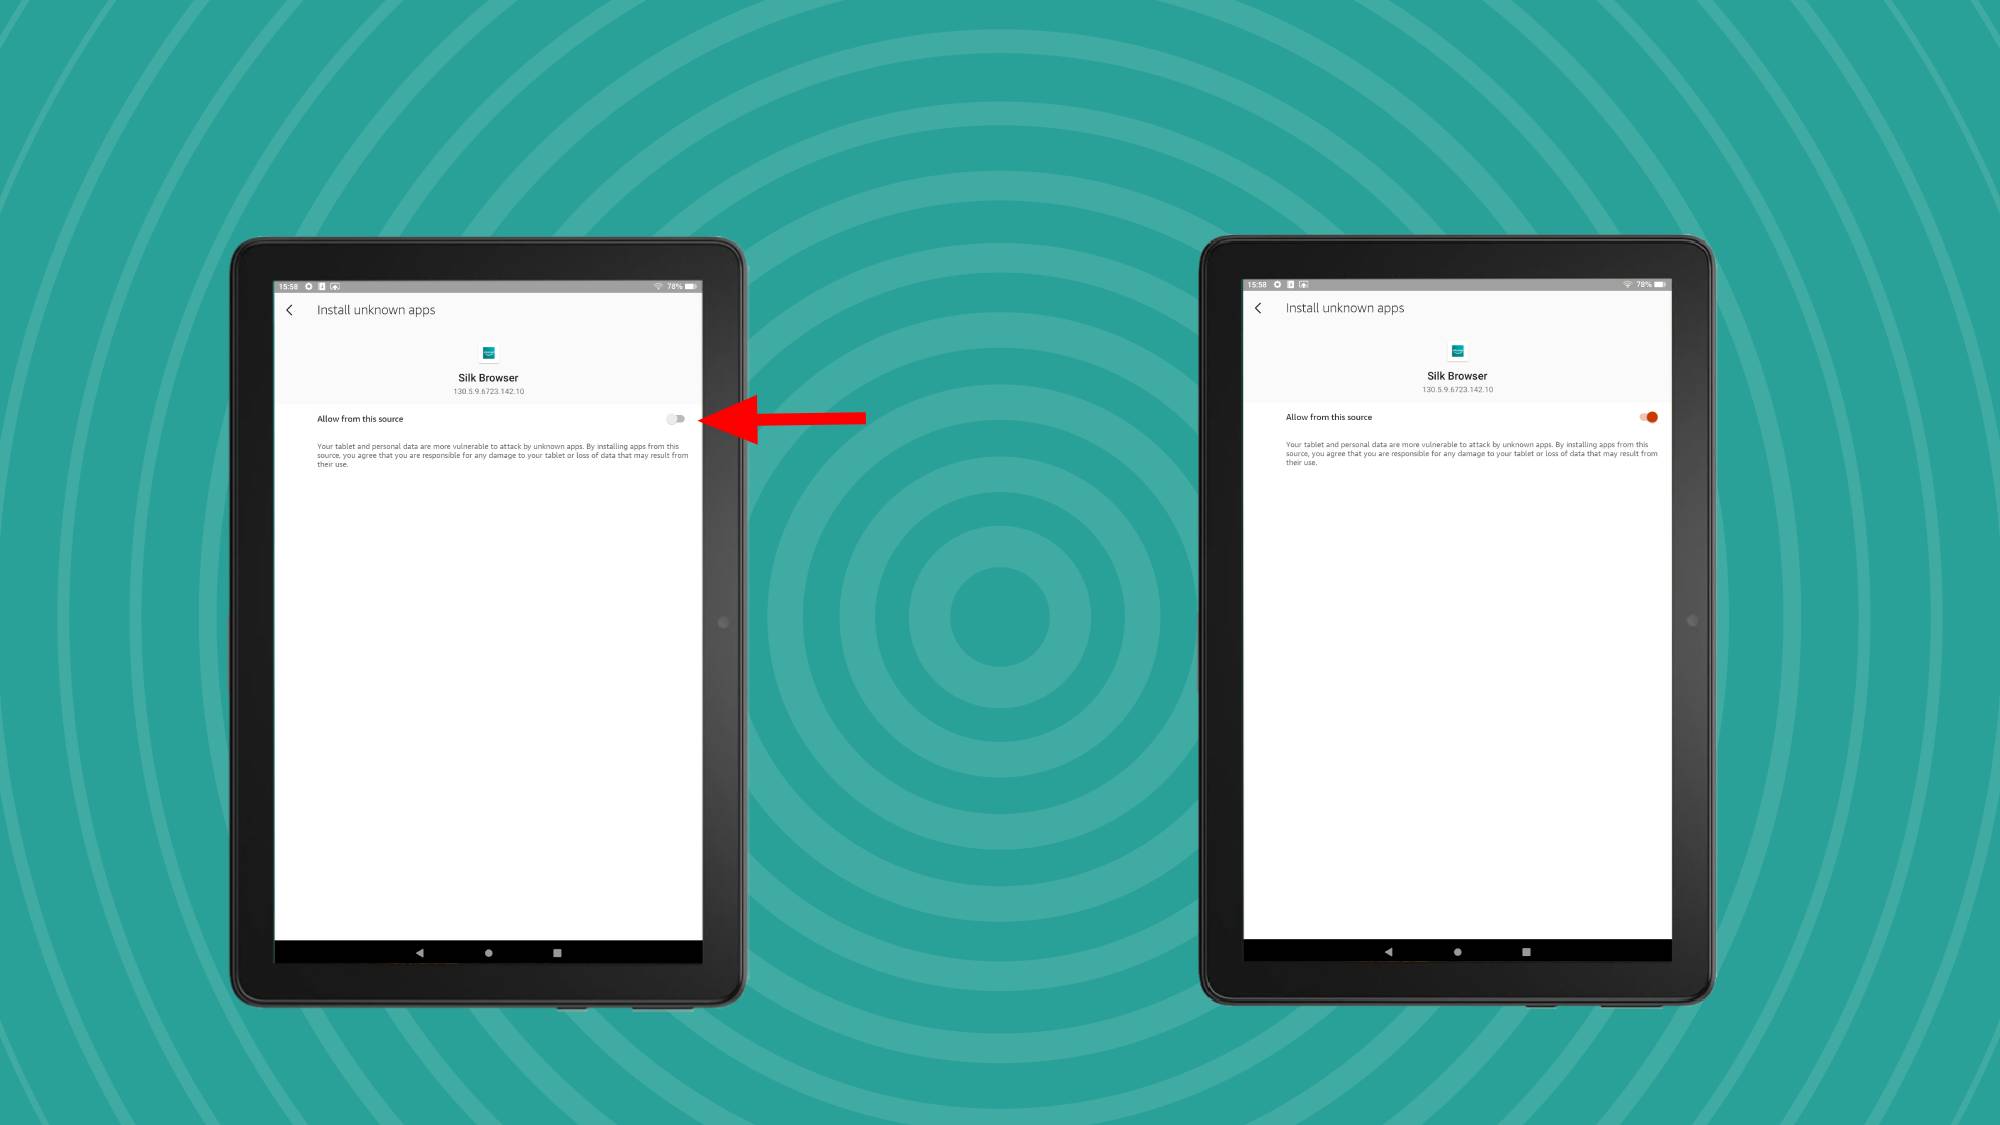
You’ll now be shown a list of all the apps you install – on mine, you can only see Silk, but if you’ve installed other apps, you’ll have a longer list. Select Silk Browser because this is the one you need, and toggle Allow from this source on (the dot will be on the right side, and the toggle slider will be light red).
Before we proceed, double-check that you have a decent internet connection, because we’ll be downloading some files. Once you’re definitely connected, it’s time to move on.
2. Download the apps you need
To get the Google Play Store on your Amazon Fire tablet, we’re going to be using what are known as Android Packages or APKs, which are files you download from your internet browser to install apps. It’s a way of circumnavigating app stores to get apps, basically, but there’s an element of risk since you’re allowing unvetted files onto your tablet. You’ll need to download four different ones, in order to use the Play Store on your Fire tab.
I’ll run you through the process in detail for the first app, so you know how to download APKs, and then help you work out which you need to install. The tricky bit is that, depending on which Fire tablet you have, the exact files are different.
Quite a few websites online let you download APKs. For this guide I used APKMirror, but APKPure and F Droid are generally considered to be two other safer options.
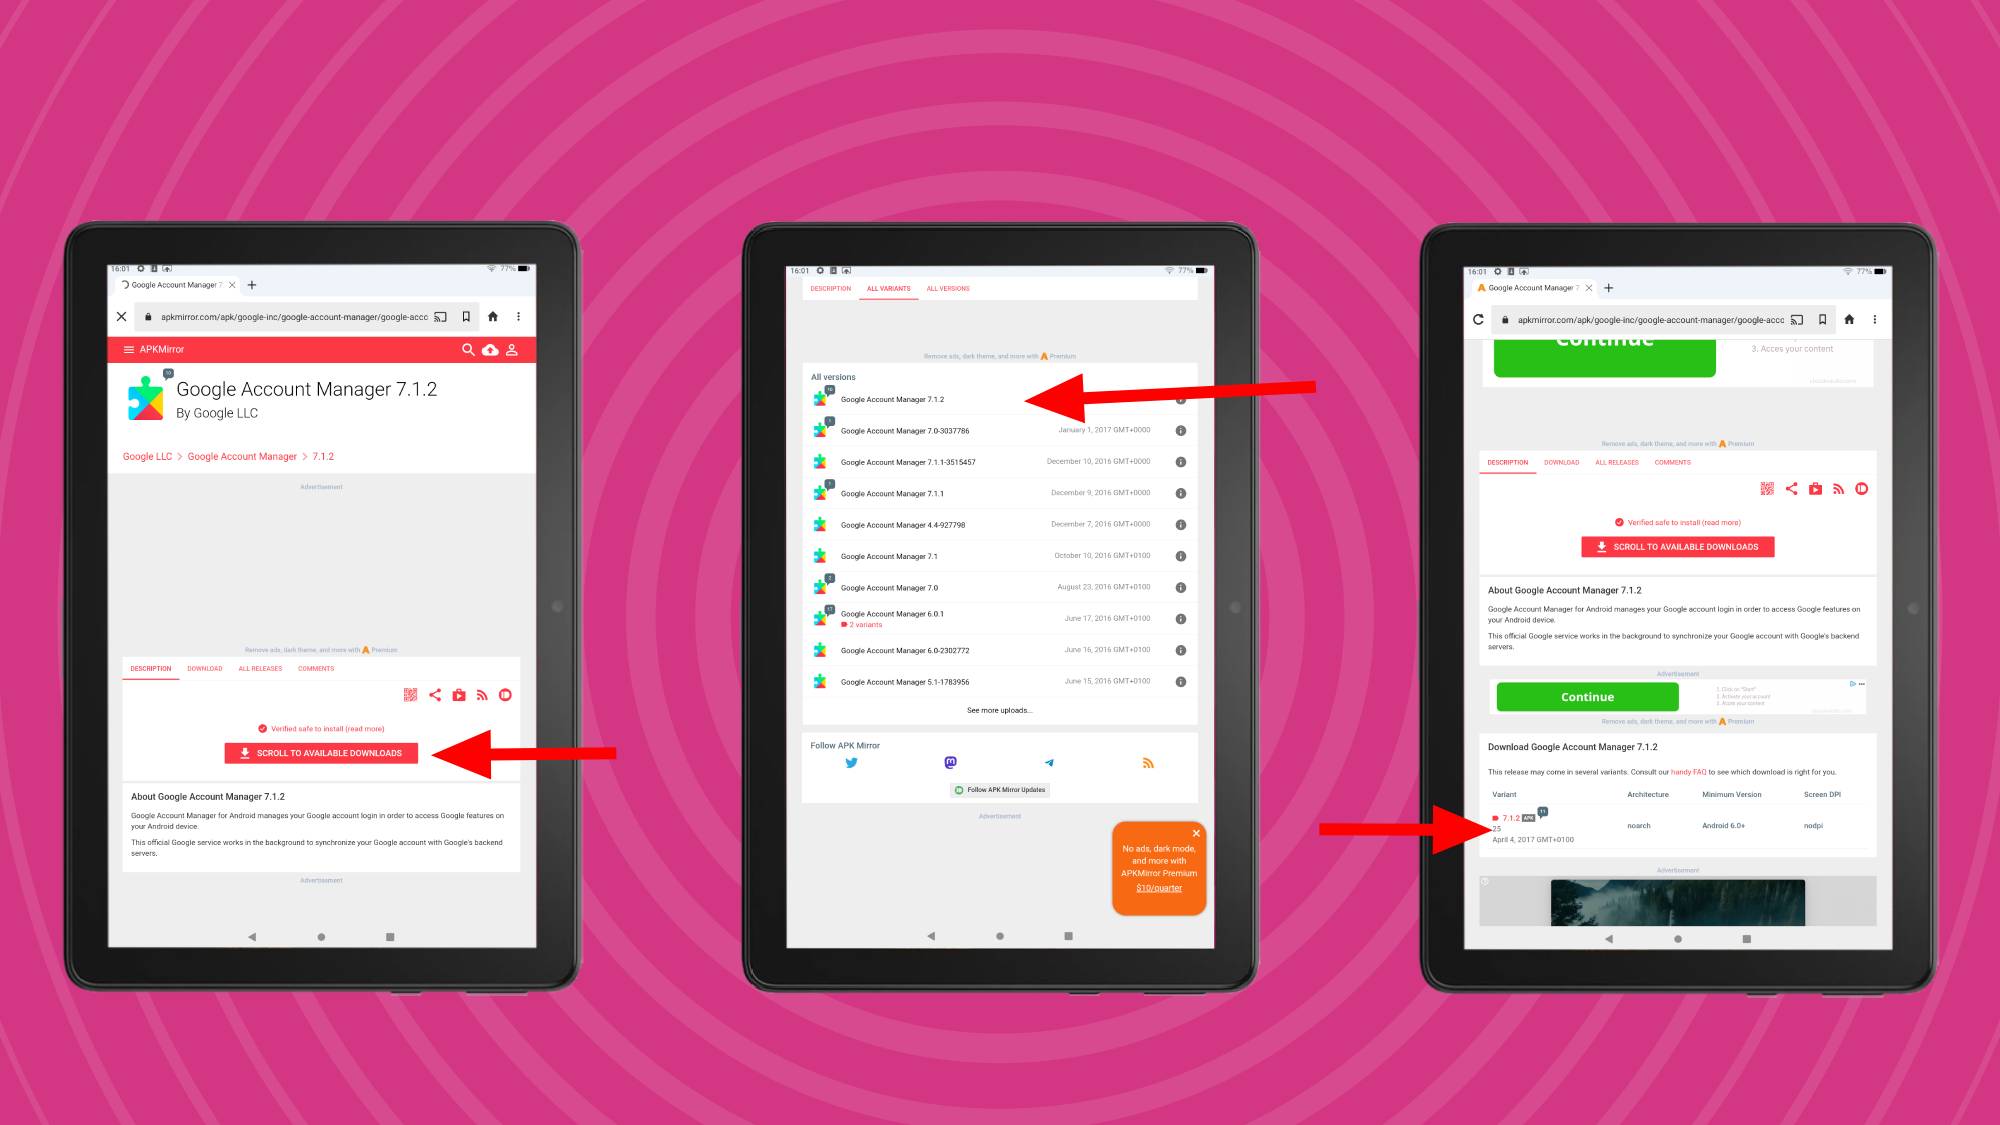
The first app you’ll need is the Google Account Manager, and there are two options to download. If you have a Fire 7 from the 8th generation or above, Fire HD 8 from the 8th generation or above, Fire HD 10 from the 9th generation or above, or Fire Max 11 from the 9th generation or above, you’ll need one called Google Account Manager v7.1.2. Other tablets need v5.1.
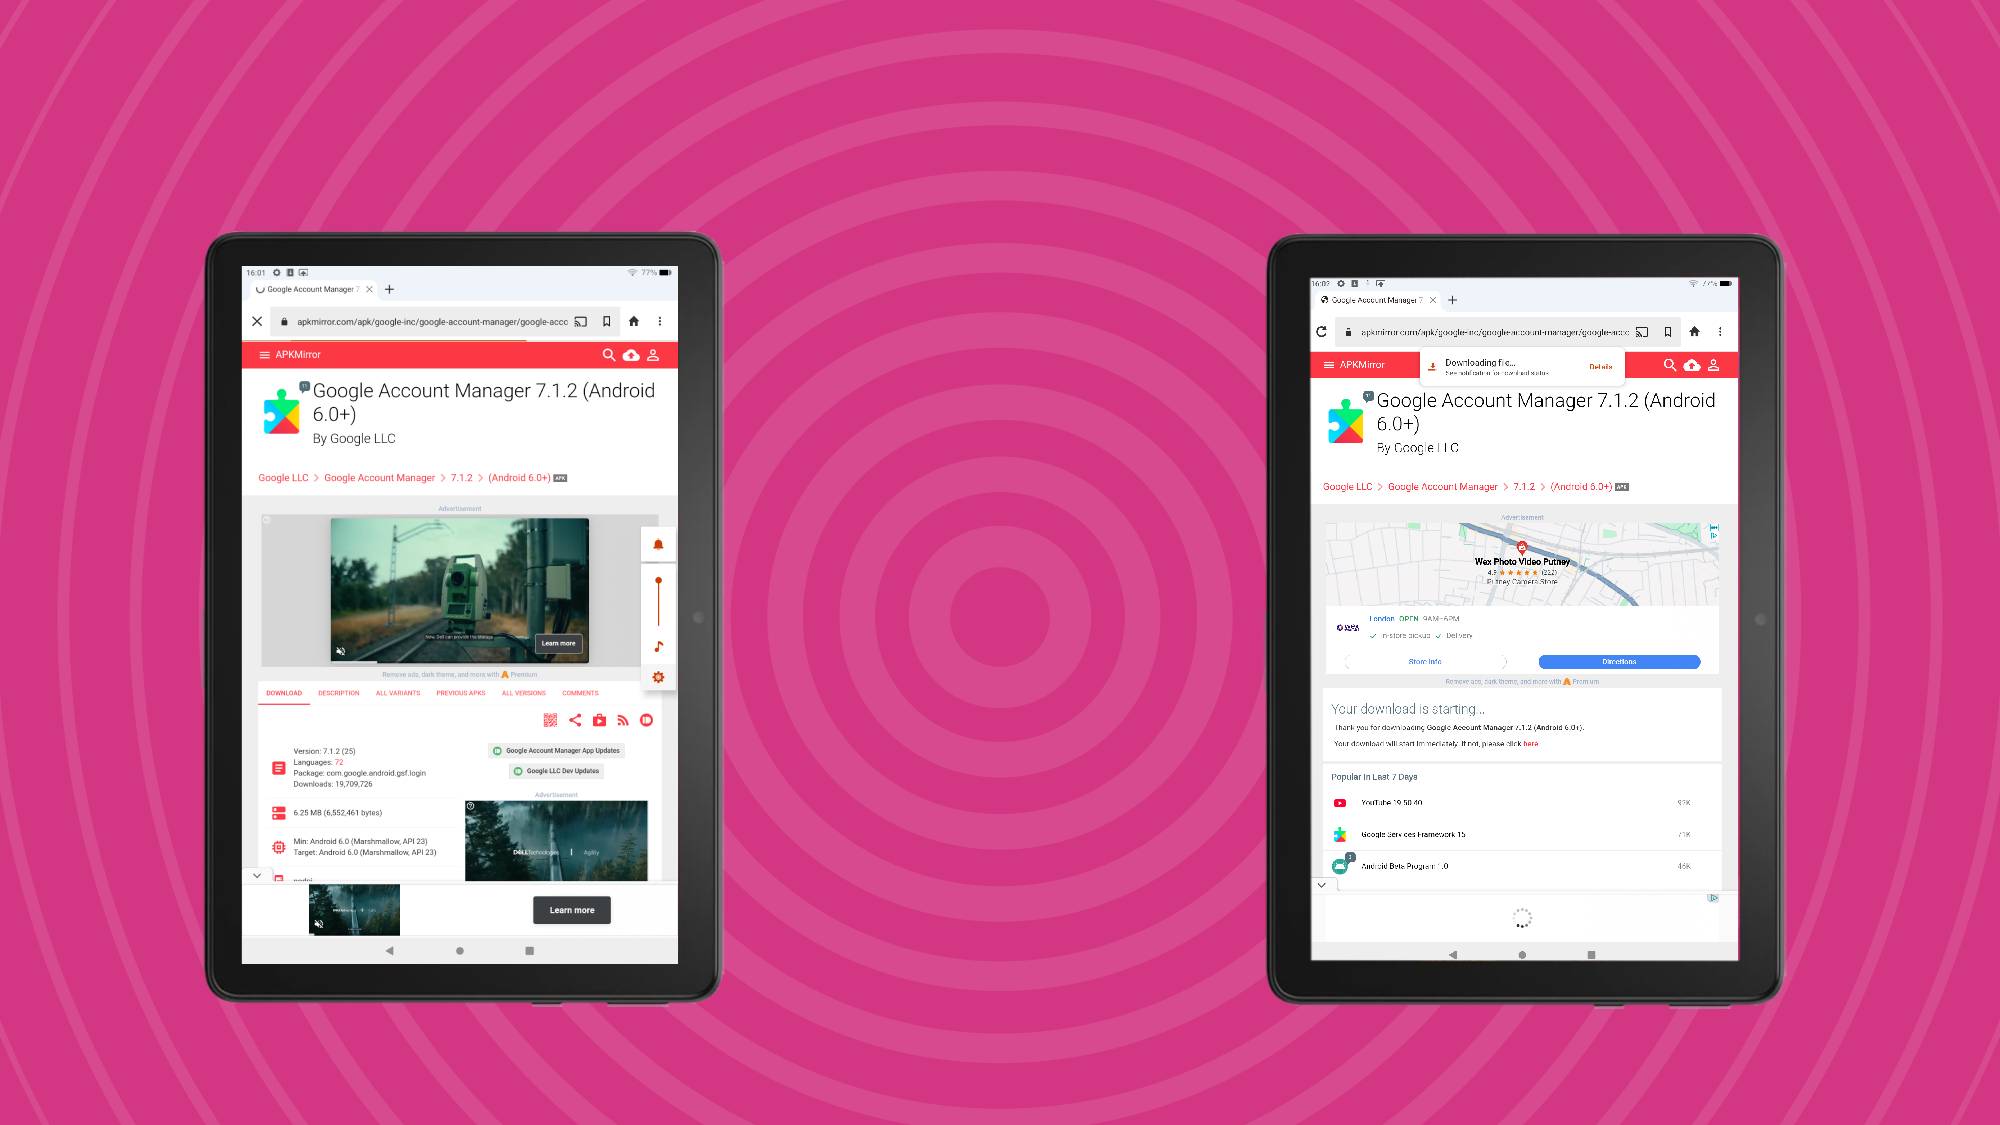
You can find these apps on APKMirror here. On that page scroll down to ‘All Versions’ and the v7.1.2 option is right at the top – v5.1 is lower down. Select the one you need. Then scroll down to Download Google Account Manager [version] and select it. On this new page scroll down to Download APK in red and select it. A pop-up will confirm that you really want to download the file – select download and the process will begin.
One down, three to go, but now the real work begins – at least you know the process for downloading an APK now.
Download numero dos is Google Services Framework, which you can find on APKMirror here. There are various apps to pick from so it’s time for another list.
If you have an Amazon Fire 7 that’s 12th gen or beyond, go for Google Services Framework V10. If it’s 9th gen then it’s Google Services Framework v9, if it’s 8th gen it’s Framework v7, and if it’s older it’s Framework v5. If you’ve got a Fire HD 8 that’s 11th gen or beyond it’s v10, 10th gen it’s v9, 8th or 9th gen it’s v7, or older it’s v5. Next, Fire HD 10, and that’s Framework v9 for 9th gen or beyond and Framework v5 for earlier. Finall,y Fire Max 11 is Framework v9. Phew!
Now onto download three, and it’s Google Play Services (not Google Play Store yet!). Find it on APKMirror here, and prepare to balk at how many versions of this there are (it gets updated most days, sometimes multiple times a day, and each new version is listed individually here).
What worked for me was simply selecting a version from the list that was listed with nodpi, and the right version of Android that my tablet had. So, which version does yours have? Well, it depends on the generation.
Anything from 2022 and beyond, from gen 12 or later, is Android 11+, and if you bought a new tablet more recently than that, it’ll be this one. If it’s in the 9th to 11th gens, it’ll be Android 9+. The exception is the Fire 7, with the 9th-gen one requiring Android 6+ alongside the 8th-gen models. Anything earlier than that needs Android 5+.
Now we’re onto the final app, and it’s the main one: Google Play Store, found on APKMirror here. As before, there are a horrid number of options in the list – pick the most recent one and find a file that’s listed as nodpi and universal for the version of Android your tablet has. Once again, download it.
3. Install the apps you need
Here’s the reason I told you to read this whole article in advance: if you install the apps in the wrong order, then you could ruin your chances of installing the Play Store, period. I did this and found that the best option was to simply wipe my tablet and start again.
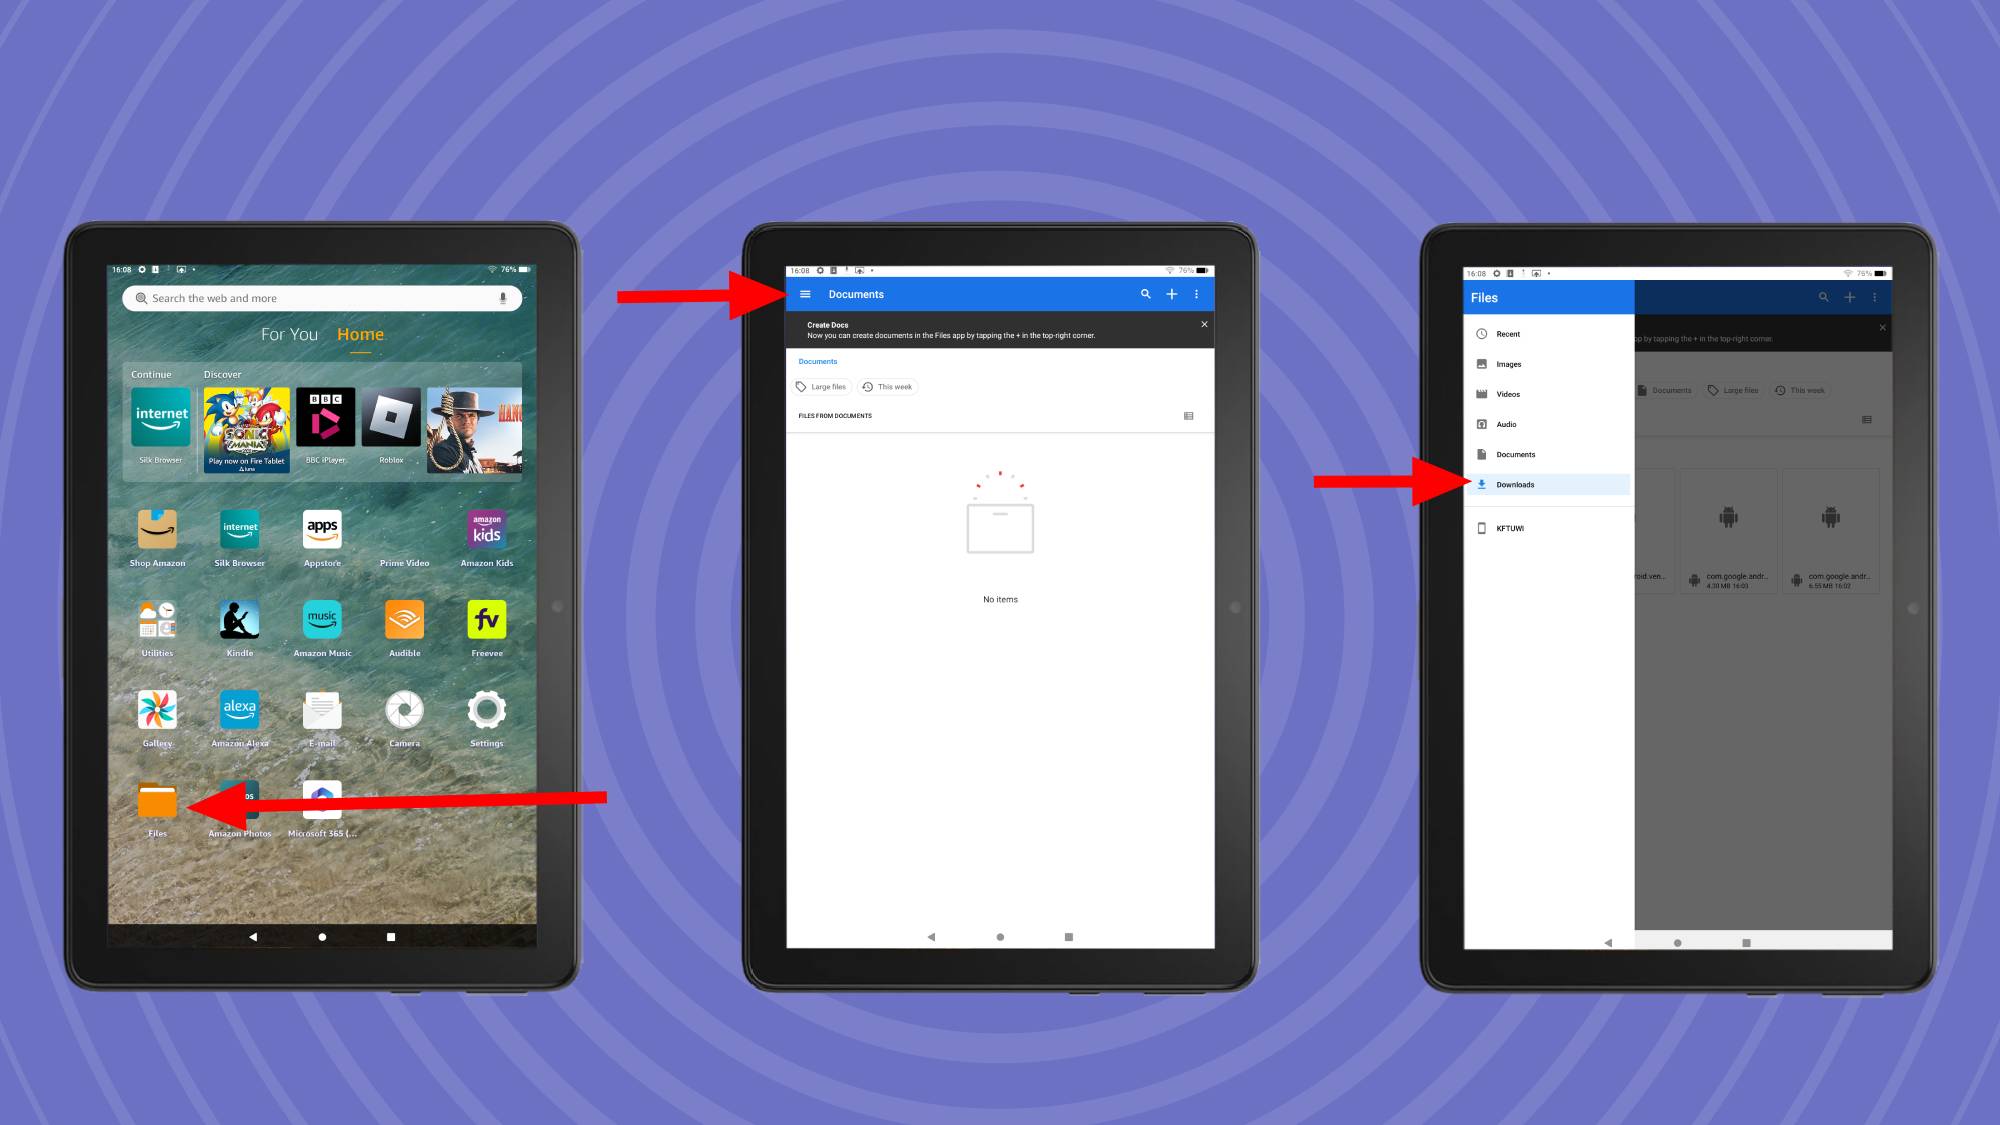
Firstly, here’s how to install APK apps on your Fire tablet. On the home page, select Files (the icon is a folder) and then press the three-horizontal-line hamburger menu at the top-left (next to the word Documents in the blue bar). In here, select Downloads.
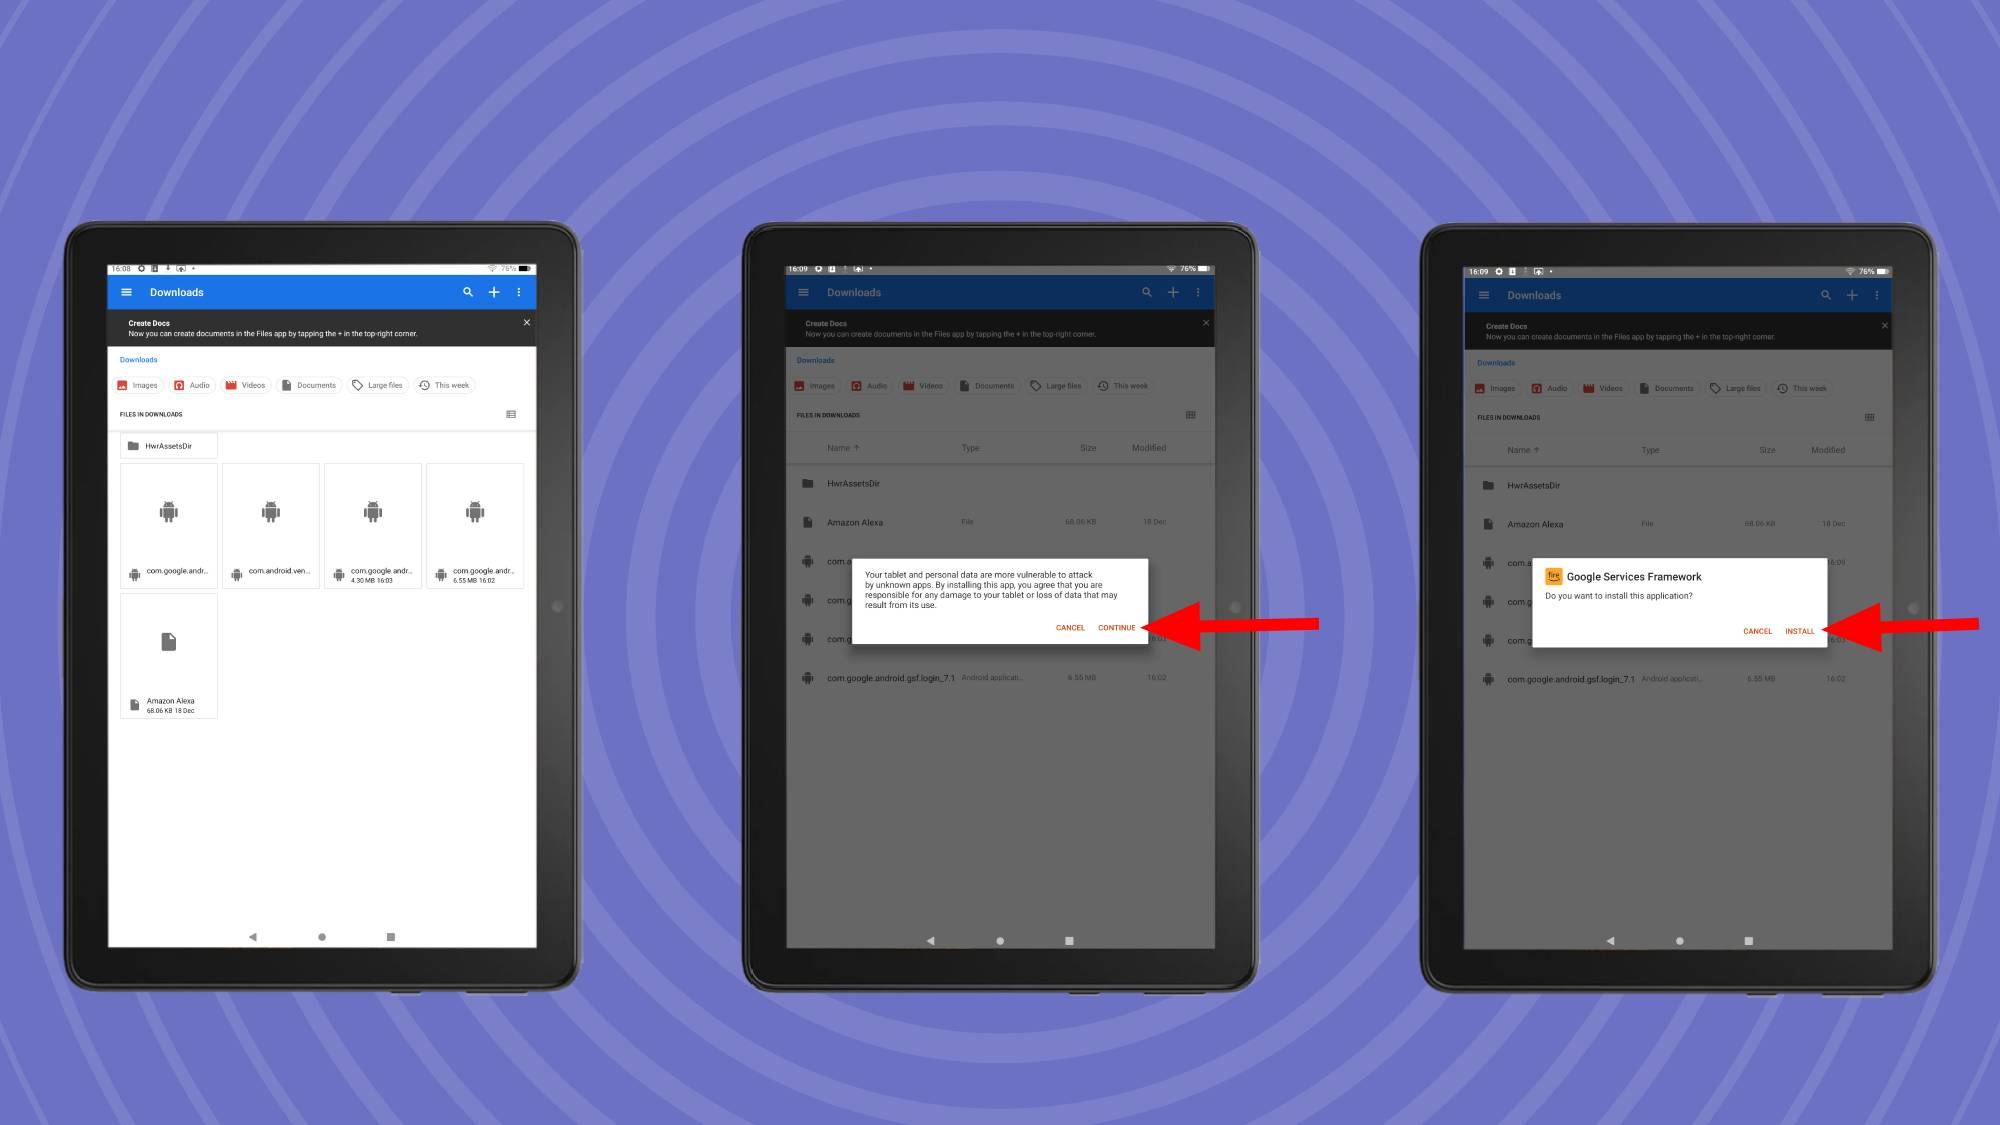
Now you’ll see listed all the files you downloaded, and I’d recommend holding your tablet landscape for this part so you can better see the file names.
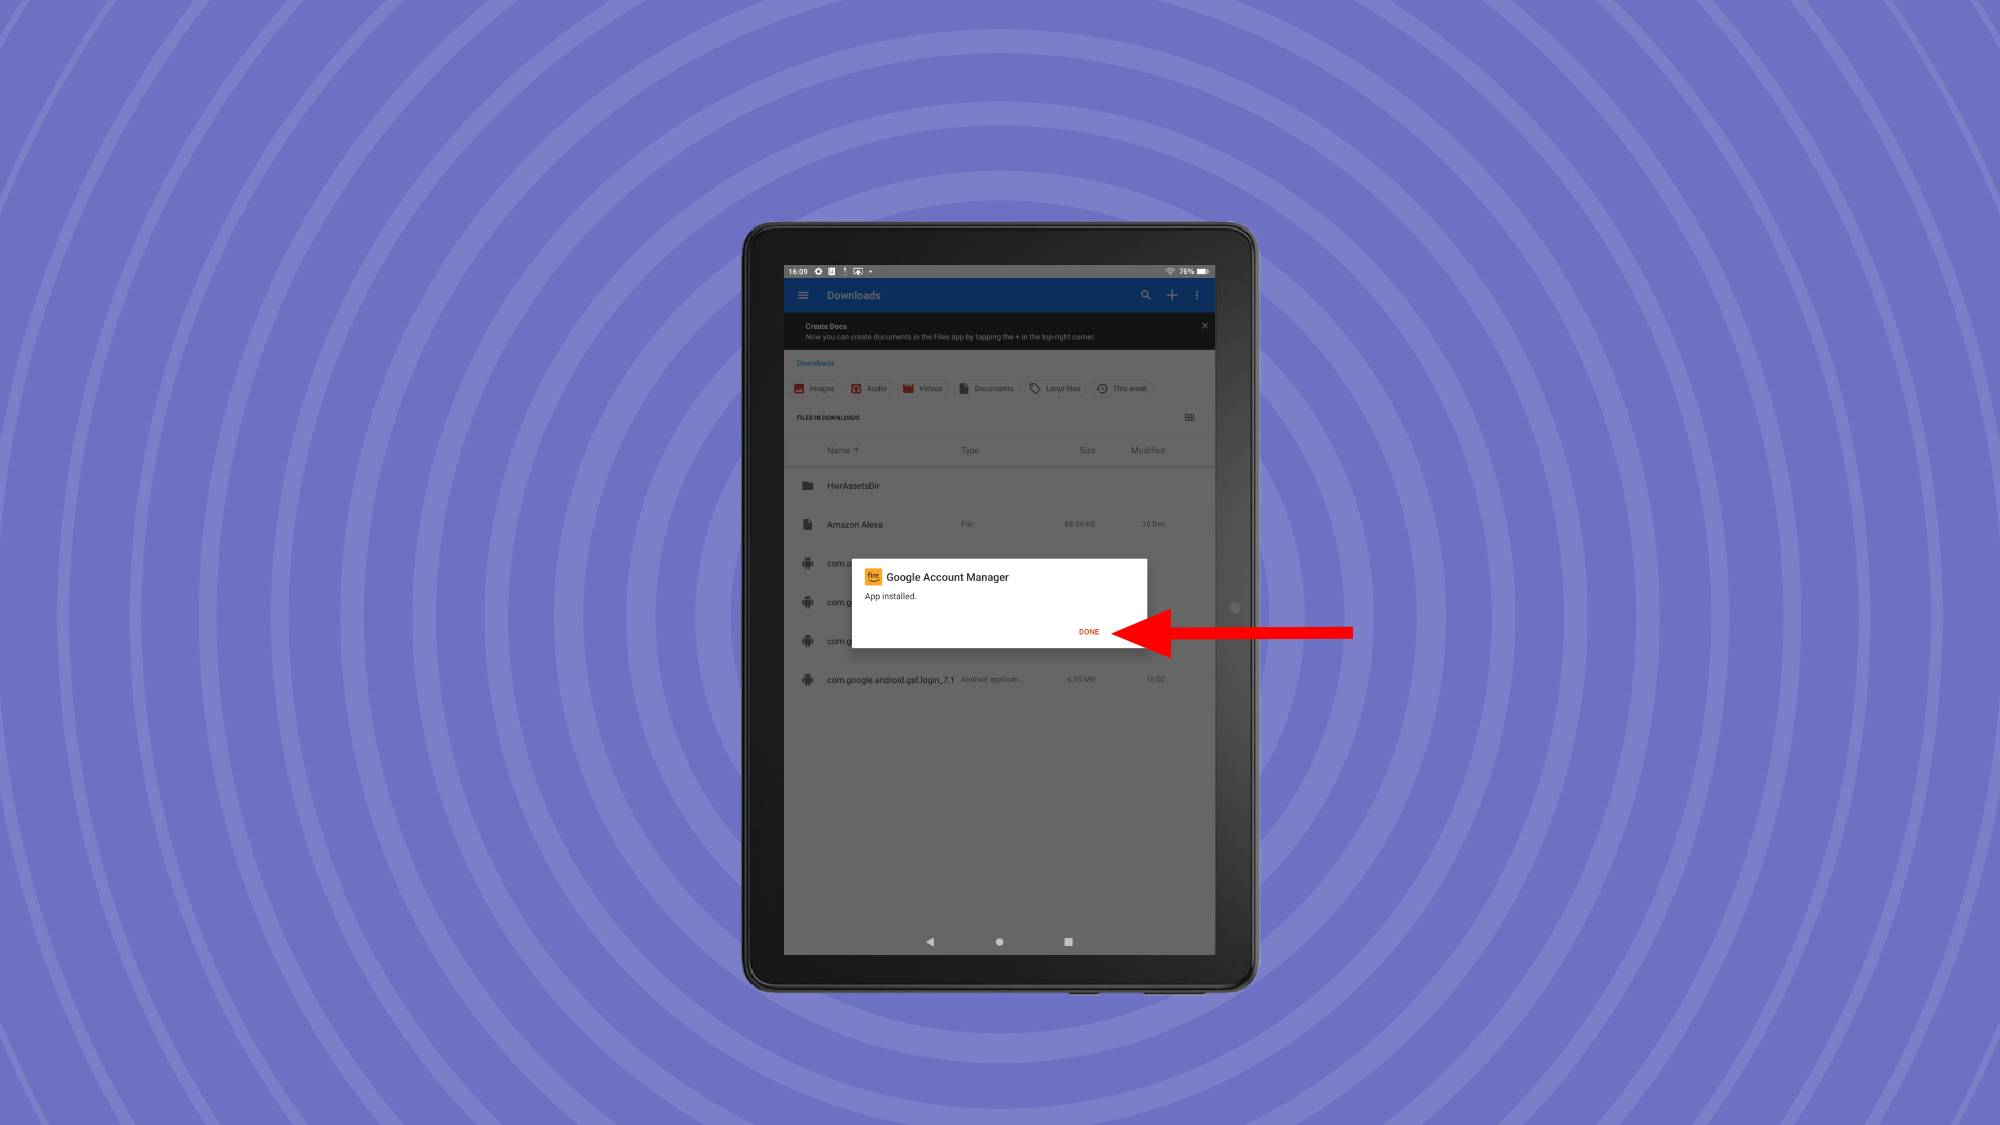
To install an app, press it, then when the disclaimer appears select continue. You’ll get another disclaimer, press install. Now the app will install. Vitally for this process, every time you install an app, press Done and NOT Open!
Now on to the order:
1. com.google.android.gsf.login (Google Account Manager)
2. com.google.Android.gsf (Google Services Framework)
3. com.google.android.gms (Google Play Services)
4. com.android.vending (Google Play Store)
For the Play Store installation, you’ll again be prompted to open it but do not press open!
4. Prepare your tablet for the Play Store
There’s one vital final step before you use the Play Store: reboot your tablet.
Reboot your tablet by pressing and holding the power button (that’s the one you press to lock and unlock the device). If you hold it for a few seconds, a menu will appear letting you restart the tablet or turn it off (turn it back on by pressing and holding this button again).
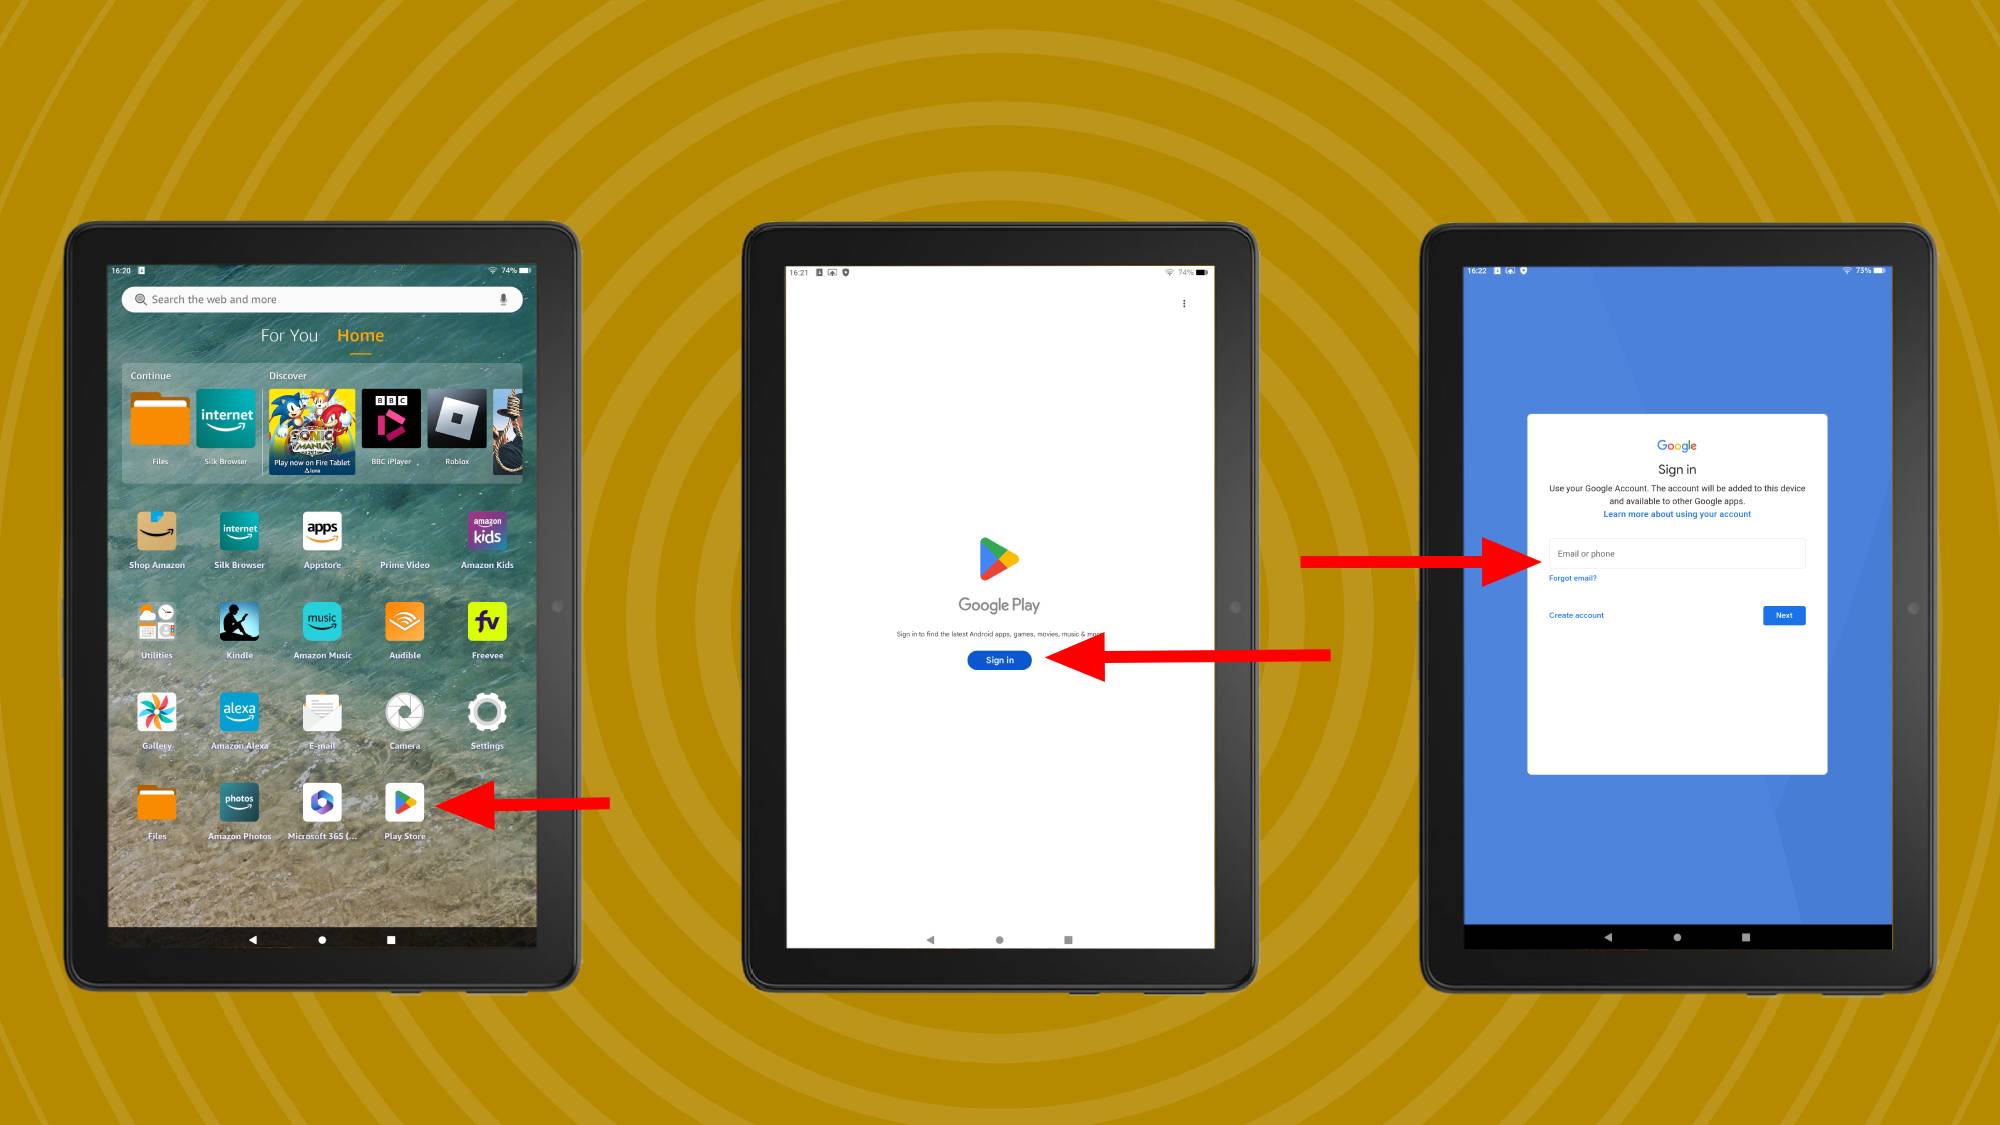
Once your Amazon Fire tablet has warmed back up, give it a few moments, and then press the Play Store icon on your home page.
You’ll have to log in to the Play Store using your Google account and then, in theory, you should be in! When I first did this, the Play Store initially thought something was wrong and gave me an error message, but then it let me go through to the Play Store and log in anyway.
Once you’ve logged in to the Play Store, you can now download apps just as you would on any other tablet.
Troubleshooting
What if I install the apps in the wrong order?
If you’ve installed the apps in the wrong order by accident (or because you don’t like following rules), then you’re out of luck. I’d recommend resetting your tablet and restarting the process from the top.
What if the Play Store icon is there, but won’t open?
I had this: if you can see the Play Store icon on your home page, but pressing it doesn’t do anything, then you haven’t got the right apps installed, or you didn’t install them in the right order. You’ll have to reset and start again.
What if I can’t work out which downloads I need?
As I said, this is a really complex process, especially if you’re not a determined tech fan who knows the model number and software version of their tech off by heart.
The first step of the above guide will help you find your tablet number, and using either Google or a TechRadar review, you can see which software version you’re on. Make sure your software is up to date (also in the Settings app) while checking this.
If you’re still struggling to get the downloads to work, you might need to try the old trial-and-error approach. Researching for this guide, I found countless people online who’d had to install loads of different files to work out the right one!
What if I just can’t get it to work?
There may be some cases when you follow these instructions to the letter and it just doesn’t work. This might be because the APK versions have changed since this article was written in December 2024, or because Amazon’s tablets have changed software.
I’ve seen reports online that some Amazon Tablets just don’t work with the Play Store, whatever you do, and some do or don’t depending on which software version you’re on. Most confusingly of all, sometimes updates will suddenly make it work or stop working on certain devices.
I’d recommend making sure you’re on the newest software update and that you’ve rebooted your device several times if it doesn’t work straight away. But if nothing gets this to work, it might be worth simply picking up a different tablet to access the Play Store, or just getting used to the apps that the Amazon Tablet provides.
